Framebuffer setup for passes output in general and mia_material_x in particular
In this article I want to describe manual method for outputting passes with mentalray. Starting from version 2009 maya has a nice new passes system right in the renderSettings. Now Maya 2010 is already available… So why bother?
The answer is very simple – up to now this seemingly nice system works adequately in presentations and tutorials only, but problems become obvious even in medium-level tasks. Very often I use awesome mia_material_x shader, that can handle most of the materials needed, but even in special _x_passes version (which is a bit slower, by the way) it’s not fully and properly supported by this new system. The shader itself has all outputs we need that could be plugged into custom buffers and written out as separate passes, but this is where the main problem of this system resides – simple addition of a custom buffer, even empty one, slows rendering down… sometimes very considerably (the scene I use as an example in this article slows down from 7 min to 57 min).
So, this article is about an older method for outputting passes, that solves the problem of mia_material_x compatibility as well as rendering speed issue.
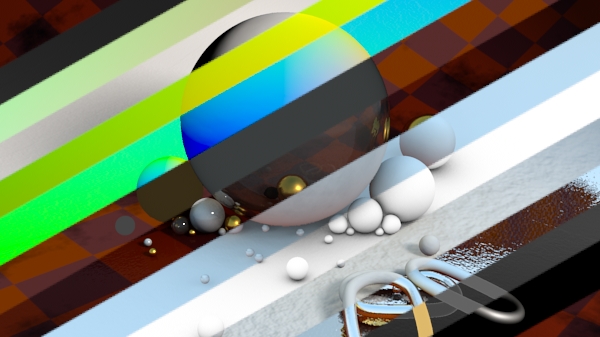
It should be said that I don’t want to name this new passes system a total trash – it’s pretty handy and could be useful in certain cases (while using standard maya shaders, for example), but it’s seriously underdeveloped at this moment… and this moment lasts for about a year and a half already, so there’s no point in counting on near future solution of all problems, at least for me 😉
So, the main advantage of old manual method is ability to output any passes we want without affecting the rendering speed that much. The price for that (which is it’s biggest disadvantage also) is a messy setup process, even Messy with a capital M… or maybe even like this – MESSY 🙂
The process and result are actually depend a lot on the following:
- version of maya: I’ll be using 2009 here. 2008 has some principal differences I’ll mention. I didn’t try 2010, but theoretically it shouldn’t be any different from 2009 😉
- buffer-shader we use: I’ll write about the most popular ctrl_buffers, as well as simplePasses and new ART_passes. First two can be obtained at http://www.mymentalray.com/ and the last one at it’s developer’s web page http://artproduction.com.ua/
- whether we output something tricky: in most cases we need just to pass out mia_material_x and some additional masks, gradients etc. – this is not a problem. A problem could be in passing out several mia_material_x shaders from the same object (for example, we want to output each light’s diffuse contribution via light linking) or additional trace shaders. Though all of these can be solved with a varying success, the risk of problems is still high.
The method at hand consists of three blocks:
- shading network: buffer-shader with data connected, in this case – mia_material_x outputs, a pack of ramps and other technical nodes. The task of buffer-shader is to pass the result of each network connected to it into a specified framebuffers (by their numerical id’s if ctrl_buffers or simplePasses is used, or by their names in case of ART_passes);
- framebuffers: receive data flows from buffer-shaders described above;
- outputs: renderCamera defines which framebuffers should be rendered through it and where to store their result.
I’ll explain each block in more details.
– shading network –
That’s how a shading network with passes set up for five materials can look like:
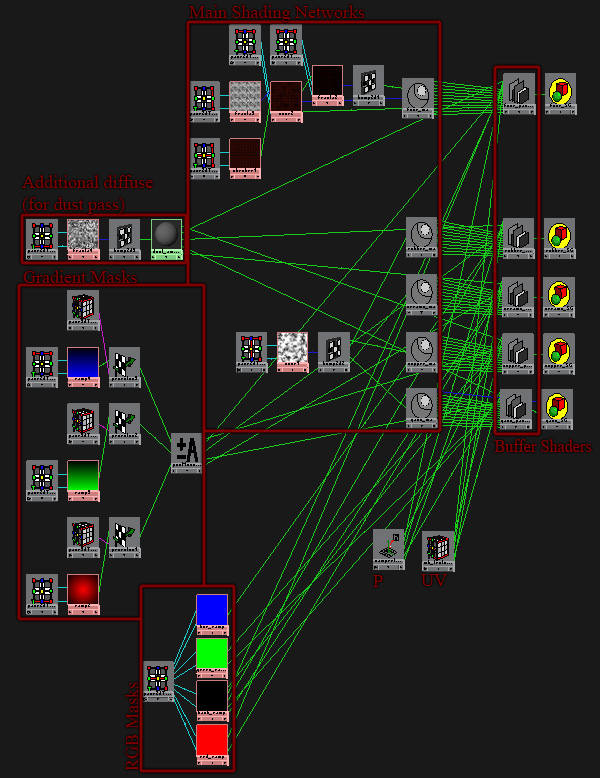
mia_material_x outputs and the ones from other shaders should be plugged into buffer-shaders in the same order for all materials, so that different data wouldn’t end up in the same pass. For example, indirect_raw data in this network is always plugged into fifth channel.
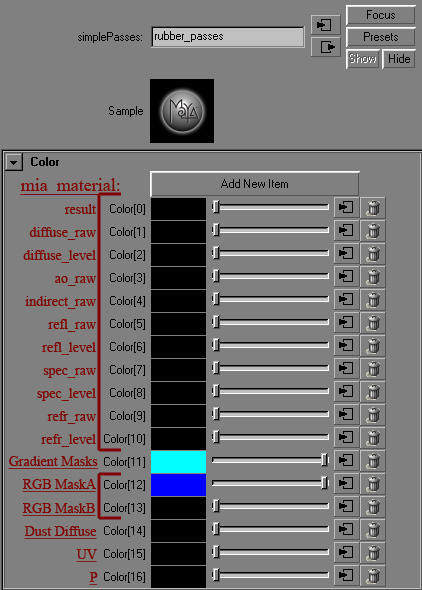
The first channel (color[0] for simplePasses, primarybuffer for ctrl_buffers, color_pass[0] for ART_passes) must have a beauty data connected to it (result of mia_material_x, outColor of standard maya shaders etc.) – to properly define sampling quality (more details about Contrast All Buffers below), trace depth (e.g. if refraction ray isn’t cast for a point in beauty pass, refraction wouldn’t happen in all passes for this point, even if they have a shader to perform it) and also to see the final image while it renders.
It’s important to mention that ctrl_buffers and simplePasses will pass their channels one by one in existing framebuffers – if we disable/disconnect one of the channels, the framebuffer prepared for it would receive data from the next channel and that would cause desynchronization of names and data afterward. ART_passes let’s us point each channel to a framebuffer with a specific name, that solves this issue and is pretty handy.
This is the interface for simplePasses with inputs connected:
ctrl_buffers is limited to 15 channels (simplePasses/ART_passes don’t have such limitation):
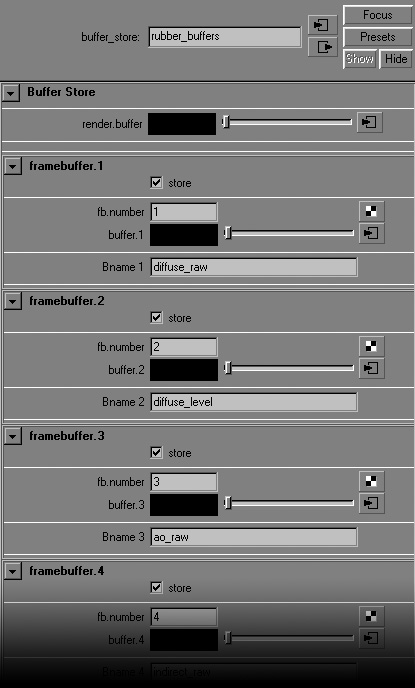
ART_passes differs from simplePasses only in having additional array to store framebuffer names corresponding to each channel:
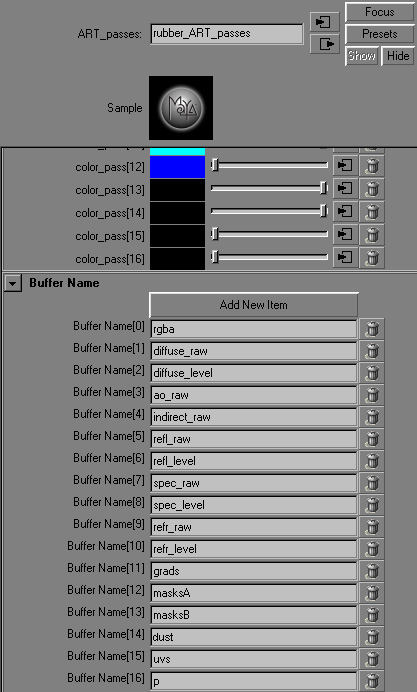
IMPORTANT! Maya’s glow always wants to slip into the first user framebuffer – it also can desync names/data and in simplePasses it also wastes beauty (unless you want your beauty to glow :)). It’s possible to leave the first framebuffer to it, but it’s better to simply disable it with Export Post Effects checkbox in renderSettings.
To easily create buffer-shader and connect existing mia_material_x to it – a script like this could be written (define the names of the outputs you want to pass out in the passes list, select all mia_material_x shaders you want to process and execute the script):
# Python Script for creating simplePasses shaders and connecting them to selected
# mia_material shaders
from maya.cmds import *

passes = ['result', 'diffuse_raw', 'diffuse_level', 'ao_raw', 'indirect_raw',
'refl_raw', 'refl_level', 'spec_raw', 'spec_level', 'refr_raw', 'refr_level' ]

selShd = ls( selection = True )
for shd in selShd:
	buf = shadingNode( 'simplePasses', asShader = True,
							name = shd + '_passes' )
	for each in passes:
		connectAttr( shd + '.' + each,
			buf + '.color[' + str(passes.index( each )) + ']')
– framebuffers –
Maya 2008 in mentalray’s renderSettings in Framebuffer>User Framebuffer section has a big button Open Editor, that pops up attribute editor for miDefaultOptions node, where needed amount of framebuffers could be created easily. In 2009 this interface is hidden, so the only way to make the setup is to create mentalrayUserBuffer node and connect it’s message to frameBufferList array of miDefaultOptions.
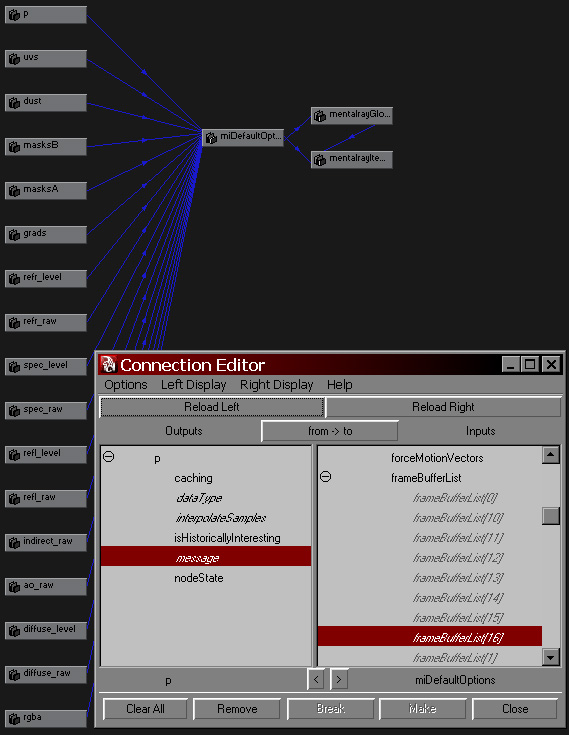
There’s no problem to accomplish that with a script (each execution will create new framebuffer and connect it to the next available index of frameBufferList):
# Python Script for creating and connecting mentalrayUserBuffers
# to miDefaultOptions
from maya.cmds import *

buff = createNode( 'mentalrayUserBuffer' )
connectAttr( buff + '.message', 'miDefaultOptions.frameBufferList',
							nextAvailable = True )
mentalrayUserBuffer interface is really not that complicated:
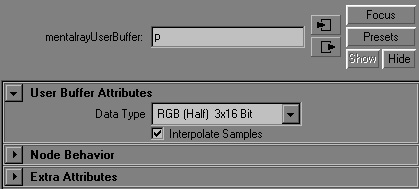
Pass bit depth can be selected and whether interpolation should be done for it. If you write to OpenEXR file format, the node name would be used for the name of the channel in exr (in 2008 it doesn’t work – exr channels would be named like fb0, fb1, fb2… in any case)
There’s a number of names that would be written into default channels of exr. For example, if you name a framebuffer node rgba – data would be written into main RGBA channel of the file. Also you can use depth, uv (that actually would be interpreted as motion vectors data :)) and I believe some others.
– outputs –
The last stage is to setup renderCamera outputs, so when rendering through it the framebuffers data will be stored into separate files (or channels of the single exr file). For this purpose there’s an interface on it’s shape in mental ray>Output Shaders section. It creates and connects mentalrayOutputPass nodes:
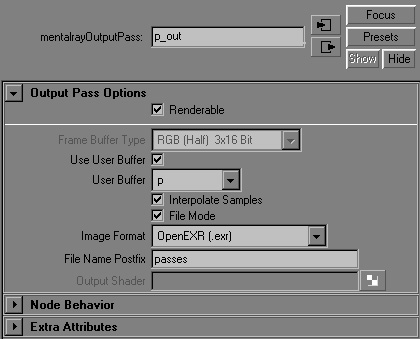
Two options are available here – to take data from default framebuffer (various bit versions of beauty, as well as depth, label, coverage etc. – in this case the name of exr channel would be taken from this mentalrayOutputPass node’s name) or user framebuffer, which we’ve defined in the previous stage (activate Use User Buffer checkbox and select the one you need from the drop-down menu). To write into a file activate File Mode and select an image format and type in a postfix (filename will be taken from renderSettings, then _ character will be added to it followed by the postfix entered, the file will be written to the directory specified by renderSettings also). If the string in postfix field is the same for multiple outputs and the image format is set to OpenEXR – single exr-file would be created with passes in it’s channels. Instead of postfix you can enter an absolute path, e.g. “C:/Temp/passes.0001.exr”, because unfortunately the first method does a bad job naming sequences – written files will need to be renamed after rendering, but you can write an expression that will generate and enter the proper string with current frame number on each update of the timeline, for example:
string $path = "C:/Temp";

string $outputs[] = `ls -type "mentalrayOutputPass"`;
for( $each in $outputs ) {
	setAttr -type "string" ($each + ".fileName")
				($path + "/" + $each + "." + frame + ".exr");
}
It’s better to improve it for your own needs (on my last project an expression like that took all paths from project settings, following that path it created subdirs with passes names (if they weren’t there already), added padding, generated nice filenames and entered them into outputs).
User framebuffers get activated on demand of an output from camera, i.e. if the renderCamera has enabled (renderable checkbox on) output that receives data from user framebuffer – this framebuffer would be created, if not – even though being connected to miDefaultOptions, it would be skipped. So, if you use ctrl_buffers or simplePasses and disable some of the outputs, that issue with names/data desync would appear also. (In 2008, on the other hand, if a framebuffer is connected to miDefaultOptions, it would be created anyway, even if no output is defined for it – this eliminates the issue).
– misc –
Having verbose set to at least 4 (info messages) you can see framebuffers created for the current render in the log:
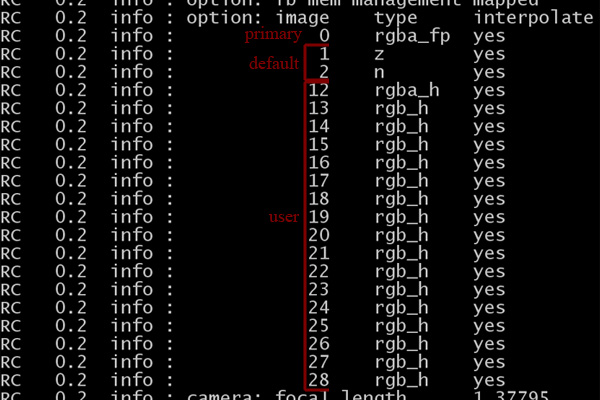
During the rendering process framebuffers will be temporarily stored in directory defined by TEMP environment variable. They could be pretty big and eat a lot of space, so you can change the value of this variable for maya/mentalray in, for example, batch file you use to start it with:
set TEMP=D:\tmp
start /belownormal D:\Maya\2009_x64\bin\maya.exe
It’s useful to disable Contrast All Buffers checkbox in renderSettings in most cases or a contrast for up-sampling would be calculated for each pass separately, that can affect rendering time drastically. If disabled, sampling for all passes would be defined by primary framebuffer (color[0] для simplePasses, primarybuffer для ctrl_buffers, color_pass[0] для ART_passes). Of course, passes would be of less quality, but usually only in places they could be as such. If beauty pass contains enough details in all regions we need – there would be no problems in passes also (if some areas of beauty pass are in darkness, for example, you’d see a poorer sampling in passes there).
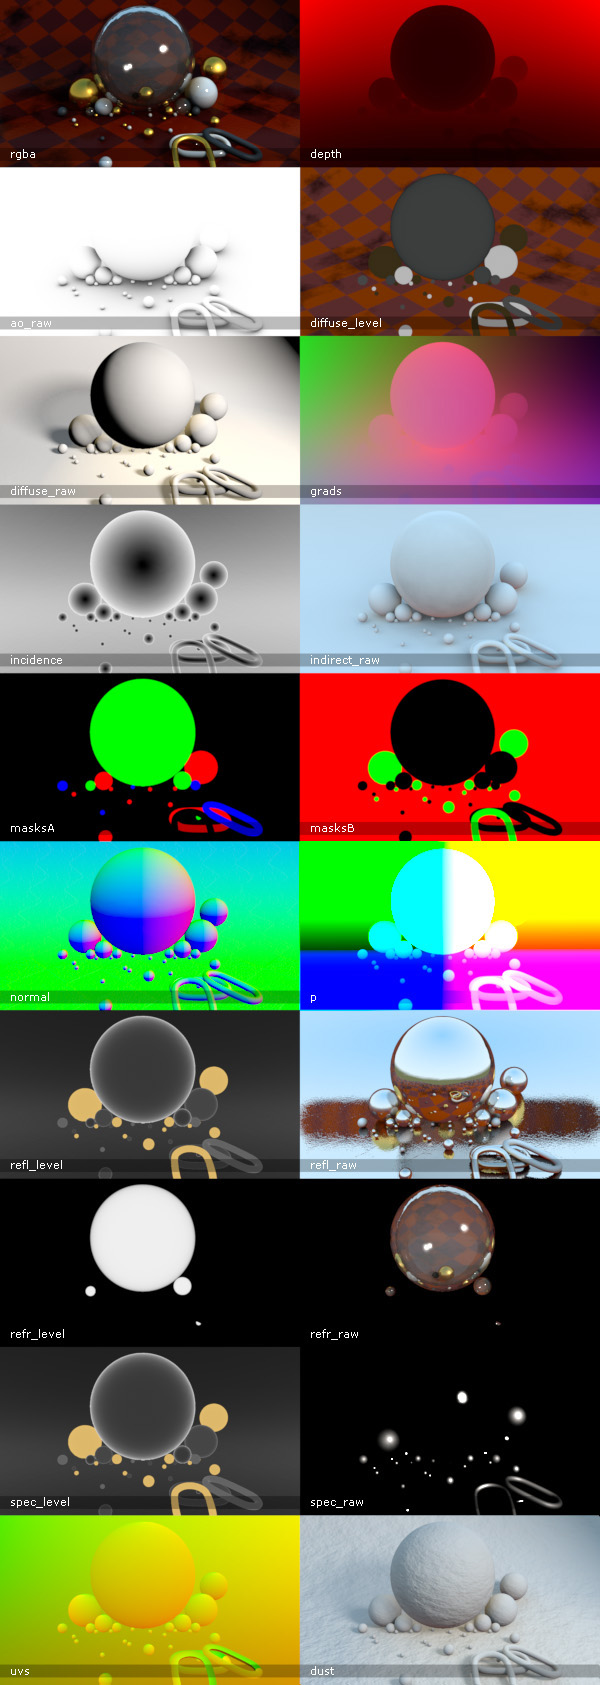
Shaders with lighting calculations (e.g. lambert for dust pass in the example scene) or trace are usually faster to render as a separate process since as passes they can slow rendering down much more – that’s better to test in the actual scene. I’m adding an example scene with a finished setup for simplePasses – without any passes it renders in 6m50s and with 19 passes – 7m00s, so the slow down is pretty negligible. There’s this lambert at hand also (incidence data from samplerInfo is connected in this scene instead of it) – if you reconnect it, render time will be approximately 13m30s, though separately it would take just 16 seconds 🙂
And as a conclusion – which shader should we actually use…
- ctrl_buffers appears to have a strange problem – while outputting passes through it, all bump becomes more prominent – not identical to the render without any passes. More to that, render time doubles (this shader has an internal check of a sort that allows it to eliminate issues with some tricky multi-shader setups I’ve mentioned in the beginning, but in this case we don’t need that, we want speed ;)). And also it’s 15 channels limitation, so… I guess, you should use it if other two cause problems.
- simplePasses doesn’t have such issues – rendering time almost doesn’t change (if those conditions about additional calculations mentioned above are met) and you can make as many passes as you like, so, despite it’s less comfortable setup, it’s more beneficial for this task.
- ART_passes is a bit slower (7m20s vs 7m00s by simplePasses), but it allows to avoid messing with channels and framebuffers order (desync stuff) and gives an option to easily disable passes by turning off renderable checkbox for outputs, so, in my opinion, that makes it the best choice for passing out mia_material_x.
In: Render · Tagged with: ART_passes, ctrl_buffers, expression, framebuffer, maya, mentalray, mentalrayOutputPass, mentalrayUserBuffer, mia_material_x, miDefaultOptions, openEXR, pass, perfomance, script, shading, simplePasses

on 17 January 2010 at 13:25
Permalink
Thnx, a lot. Right at time when i need it.
on 18 January 2010 at 9:27
Permalink
Thanks a lot. A great read. Not sure if you have dropped by these two CGTalk threads below. They are working on multipass shader based on the megaTK shader.
http://forums.cgsociety.org/showthread.php?f=87&t=828928
http://forums.cgsociety.org/showthread.php?f=87&t=843425
Also, a matte-pass generator shader is under construction here:
http://forums.cgsociety.org/showthread.php?f=89&t=843279
– Jason
on 21 January 2010 at 9:39
Permalink
А можно ли получить вдобавок ко всем пассам еще и Shadow pass? За один рендер проход, при условии, что используется mia_material_x_passes.
Есть ли хоть какое-нибудь решение по данной проблеме?
on 22 January 2010 at 0:52
Permalink
У шейдера к сожалению нет такого аутпута, поэтому его средствами похоже это сделать не получится. Можно в состав распассовки впихнуть mip_matteshadow (если shadow выставить в белое – можно получать в rgb результат), но это разумеется дополнительные вычисления – насколько существенные – надо пробовать.
on 22 January 2010 at 9:55
Permalink
А difuse_raw как shadow_pass использовать можно? У p_megaTK shadow_pass очень похож на difuse_raw.
on 22 January 2010 at 10:04
Permalink
diffuse_raw это комбинация прямого освещения, теней, самозатенения и неосвещенных участков. Т.е. тени в состав конечно входят, но отделить их от всего остальное вряд ли получится… если стоит цель именно получить исключительно брошенные объектом на объект тени.
on 22 January 2010 at 11:12
Permalink
Конечная цель в том чтобы на композе иметь возможность поменять цвет теней(добавить или сменить им цветовой оттенок), а также сделать тени более прозрачными либо наоборот более заметными.
on 24 January 2010 at 19:13
Permalink
Проделал туториал, все вроде получилось, но не совсем все 🙂
Единственное, что не понятно из туториала, что после создания simplePasses и связи его с шейдером его надо назначить объекту вместо это шедера. Ели бы не пример сцены так бы и рыскал в инете в поиске ответа :))))
А вот, что не получилось:
1. Почему-то на одной поверхности изменилась интенсивность источника света дифуз_резалт+все пасы выдает бьюти один в один, а diffuse_row+diffuse_level уже сразу слегка отличается от diffuse_result и бьюти тоже выдает другое. Отличие идет в распределении света его интенсивность слегка меньше становится. Почему так могло получится?
2. Один из объектов имел mia_material_x с выбраным пресетом — Glass solid. Он давал голубую прозрачную тень, после связи его с simplePasses и переназначении simplePasses на этот объект, в рендере сразу выдает другую тень — просто черная тень как от непрозрачного объекта. Как это можно обойти?
on 26 January 2010 at 0:37
Permalink
1. Не могу сказать наверняка.
2. Попробовал Glass Solid – получил голубую тень как в бьюти, так и в diffuse_raw. Возможно надо взять более свежый патч майи (у меня 2009 x64 SP1a)
on 26 January 2010 at 12:44
Permalink
По поводу тени, я тоже получил. Там моя проблема оказалась в том что, при наложении simplePasses на объект вместо mia_material_x, нужно в шейдергруппе в shadow shader вместо simplePasses оставлять mia_material_x. Тогда тени правильные получаются. В любом случае спасибо за помощь 🙂
on 2 February 2010 at 0:46
Permalink
Great post. Great blog, lots of good stuff here . . .
Had a quick question. I’m on a Mac using 2008. When I render images using simplepasses, all works fine except that I’m getting blown out images (except reflections). All the passes are correct, just WAY overbright. Any ideas on what this could be?
Z
on 2 February 2010 at 0:52
Permalink
Yeap, I guess I’ve mentioned that – you need to turn off Export Post Effects checkbox in Render Globals>Options – that’s shader glow messes everything up for some reasons.
on 2 February 2010 at 18:59
Permalink
Hmm. Yeah, I’m actually doing that. Looking more closely at it, it seems to have something to do with the physical sun & sky only. Scenes with no sun/sky work fine, IBL/HDR stuff included (including exposure shaders and all that). But the sun/sky system seems to blow out the renders in the passes. The “result” pass is completely different from the actual beauty render and all the passes seem to want to add up to this messed up/blown out version. Can you think of why this would be happening?
Thanks again.
Z
on 4 February 2010 at 2:05
Permalink
Yeah, I see now what you mean. The thing is – framebuffers don’t give a damn about lens shaders. s&s adds pretty heavy one – if you remove it from camera, you’d get in beauty the same blown out result as in passes – that’s just what s&s does to your picture without gamma correction applied, so everything seems to be correct.
s&s default gamma CC has gain set to 0.2, it has also other settings, but multiplying your light passes by 0.2 in comp makes a pretty similar picture.
on 4 February 2010 at 7:44
Permalink
sweet. Thanks a ton. Thought I was crazy:)
Keep up the good work, man.
Z
on 15 February 2010 at 14:16
Permalink
Fantastic stuff, although I am having trouble figuring out how you rendered you normal pass, as I have looked at your shader and there seems to be no connection allowing that pass?
Which number is it? Its not color16 due to the fact that is the position pass.
on 15 February 2010 at 15:15
Permalink
It’s a native mr pass (as well as depth and a couple more) – it can be output directly from camera through mentalrayOutputPass node without user buffers.
P.S. I ran it on vista (crazy OS) and found out that you need to make all your native outputs AFTER userBuffer outputs or render would fail (no such problems in XP).
on 19 March 2010 at 3:17
Permalink
А кто нибудь может подсказать где найти информацию о создании многослойных текстур с использованием масок и рендеринге всего результата в Ментал рей?
on 19 March 2010 at 3:18
Permalink
* по пассам.
Забыл добавить)
on 20 March 2010 at 2:34
Permalink
Для этого можно воспользоваться шейдером mix8Layer – в нем и общий микс можно собрать с использованием масок, а также каждую из них отправить в фреймбуффер встроенными средствами (т.е. в вышеописанном сетапе вместо буффер шедера может работать mix8Layer).
Либо собрать все вручную и подключить к обычному буффер шейдеру. По сути надо умножить текстуру на маску (colorGain как самое простое решение) и отправить маску как альфу – можно через mib_color_mix
on 10 June 2010 at 7:12
Permalink
Hello, Sagroth
Nice Blog, thx for sharing so much info.
Today i found a good news at http://mayastation.typepad.com/maya-station/2010/02/writetocolorbuffer.html
that:
“Note: in Maya 2011, the writeToColorBuffer node has been rewritten and does not increase the render times as in previous versions of Maya.”
on 10 June 2010 at 9:34
Permalink
Yeap, I know, thanks. I’ve even tested this in 2011 myself already and it seems to be working properly now, though rendering a lot of different passes at once was pretty slow still (I need to do more tests on that). We’re still in 2009 anyway 😉
on 17 June 2010 at 1:23
Permalink
Hi, first of all thanks for your ART passes. I am trying to make them work in 2011 but getting stuck.Is it possible for you to post a scene example file where the scene is setup using ART passes.in the scene above available for download you have used Simple passes. Also, We need to use KSL frame buffer manager as in maya 2011 they Autodesk has hidden the feature of User framebuffer. thanks in advance. also, a video tutorial to set up Framebuffer output using ART passes would be very very appreciated.
best regards,
Kamal
on 19 June 2010 at 2:55
Permalink
Hi.
ART_passes shader is not mine.
Here’s the scene for Maya 2011 with complete setup and the exr file I get from it for comparison:
http://www.sigillarium.com/blog/wp-content/uploads/FILES/art_test01.rar
2011 has framebuffer section hidden the same way it is in 2009.
Nice videotutorial about setting up buffers can be found here:
http://williework.blogspot.com/2010/03/technical-creating-custom-render-passes.html
on 1 July 2010 at 6:42
Permalink
thanks a lot. my boyfriend has been ferveriously testing me to see if I understand this stuff to be a part of his world, and I can now report back with what I’ve learned ^-^
on 2 July 2010 at 15:56
Permalink
Sounds like a pretty cruel man 😀
on 2 July 2010 at 19:37
Permalink
Great work, I’ve tried looking at the scene files but I can’t for the life of me figure out how you made the maskA, maskB, and p passes. I figured the reason was because of some lack of knowledge of ramps and/or projections.
I know to create the same effect by using render layers but your method doesn’t require any which makes me especially intrigued.
May I get some kind of reference (link/forum/tutorial) where I can learn how you mapped your ramp colors to your objects via projection?
on 2 July 2010 at 22:15
Permalink
masksA & masksB are just solid RGB-colored ramps plugged into the same buffer channel. I’ve got 5 shaders and 3 colors, so I make 3 shaders RGB and 2 just black in masksA. Then I make these last two shaders RG in masksB and the rest three of them black.
Projected ramps are for ‘grads’ pass – I just create ramp as projection and translate/rotate/scale it’s planar placement to cover the scene with green gradient from left to right, blue gradient from us in depth and red – from the center of the scene outwards (circular ramp) – then just plus them all together (since they are pure RGB – they’ll be separated without any problem in compositing). There’re three placements in the scene – take a look at them. Projecting 2D textures are explained in maya help.
p is a position of a surface point in the world space – it’s taken from samplerInfo node and just plugged into buffer channel.
Hope that answers your questions.
on 3 July 2010 at 1:39
Permalink
Oh, looks like I over thought the process a bit, that explanation is really helpful thank you. Hope to see more of your work later.
– Korinkite
on 6 July 2010 at 0:50
Permalink
okay~ just so we are clear, yes Korinkite, this is me, your girlfriend, I just wanted to say. No. Kitty is not me like you have accused me of being. BUT this was very helpful. I would love to learn how to do all of this stuff. This was well laid out and helpful.
~Kit
on 13 November 2010 at 11:07
Permalink
Hi Sagroth
Thanks for this tutorial it’s really helpful. I’m still struggling to understand how to render a cast shadows pass. Is this possible or do we still have to set up a shadow layer to get just the shadow information.
Thanks for all your help
Cheers
on 13 November 2010 at 23:36
Permalink
Hi. If you want to get shadow layer unmatted by casting objects (like a shadow on the ground) it seems you have to use renderLayer. I did some tests plugging mib_continue or other fully transparent shaders into a pass for the casting objects, but it produces weird results and render time increases greatly.
on 14 November 2010 at 0:04
Permalink
That’s a shame. Is there any combination of diff_level, diff_result and diff_raw that can be composited to control the
cast shadows? Thanks again for your help 😀
on 14 November 2010 at 2:01
Permalink
These passes won’t give you control over shadows. You need a pass that has diffuse without shadows or shadows without diffuse. Then you can divide one by another in comp to separate them. You can make additional pass with mip_matteshadow for that, but that’s additional calculations. So that really depends whether your scene export is fast enough – pretty often it’s much more efficient to render stuff like that as a separate render (furthermore ground shadows with casting objects invisible are much better in comp because shouldn’t leave fringes).
on 19 November 2010 at 4:17
Permalink
Thanks for posting, my girlfriend Kitty showed me this, I haven’t seen this one yet and it was a big help, I’m currently working on trying to fix my shadows to be a slightly different shape than the object that they are coming from so learning about shadows is helpful.
on 27 December 2010 at 3:18
Permalink
А что можете сказать об этих НЕМУТОРНЫХ ))) шейдерах, которые были сделаны на основе шейдеров Puppetа?
http://deex.info/wordpress2/tools/deex-shaders-pack/
Я в майке их не юзал, пытаюсь под макс приспособить.
За статью СПАСИБО!!!
on 27 December 2010 at 5:20
Permalink
Слышал, но никогда не пробовал. Помню были какие-то странности с бампом у ctrl_buffers и вроде то же самое в тестах с p_megaTk наблюдалось. У simplePasses этого не было, зато был ряд других 🙂 Надо будет попробовать – спасибо.
on 1 June 2011 at 14:55
Permalink
Hey Sagroth. Just wanted to say that, as a person who has been revisiting your blog in intervals, that I find myself learning new things every time I reread your posts and it has been incredibly helpful. I was just looking to optimize passes and found your tip on “contrast all buffers”. Thanks a ton!
– Korinkite